
If you own a Mac and are into *nix virtual machines for development, then VMware’s AppCatalyst is a must have because…
AppCatalyst is free!
AppCatalyst is targeting that hip Application/DevOps demographic that loves Macs, Linux, API/Scripting and hates GUIs. You know the same demographic who also loves free stuff for development! I resemble that comment…
Who wouldn’t like AppCatalyst? People with out a Mac, or people running Windows VMs. For that audience there is still VMware Workstation, Fusion and other virtualization alternatives.
If your still with me, then download the hotness from….
VM’s Phssssshhhha! How do I make it useful for development?
I’ll skip the usual unzip instructions as many other blogs have covered the basic install. The remainder will focus on how to integrate AppCatalyst into your development environment using Vagrant and an IDE, in my case it’s IntelliJ, the result will be a simple NodeJS application.
Vagrants and Containers
I’m talking third platform apps, not your local alley bar. AppCatalyst is packaged with project Photon, a container run time host.
Download vagrant to your desktop. https://www.vagrantup.com/
I won’t go through the vagrant install process. It’s easy and well documented on the internet.
Install the AppCatalyst plugin for vagrant.
$ vagrant plugin install vagrant-vmware-appcatalyst
I’m also using project Photon as the container host. There is a vagrant plugin for photon too! Install the photon plugin for vagrant.
$ vagrant plugin install vagrant-guests-photon
Now you need a VagrantFile. No, that’s not someone that has a fetish for vagrants. You know a VagrantFile, like this…
# Set our default provider for this Vagrantfile to 'vmware_appcatalyst'
ENV['VAGRANT_DEFAULT_PROVIDER'] = 'vmware_appcatalyst'

nodes = [
{ hostname: 'nodejs', box: 'vmware/photon' },

]

$ssl_script = <<SCRIPT

echo Setting up SSL...

mkdir -p /tmp/SSLCerts
cd /tmp/SSLCerts
openssl genrsa -aes256 -out ca-key.pem -passout pass:foobar 2048

openssl req -new -x509 -days 365 -key ca-key.pem -sha256 -out ca.pem -subj "/C=US/ST=GA/L=ATL/O=IT/CN=www.inkysea.com" -passin pass:foobar

openssl genrsa -out server-key.pem 2048
HOST=`hostname`
openssl req -subj "/CN=$HOST" -new -key server-key.pem -out server.csr
IP=`ifconfig eth0 | grep "inet\ addr" | cut -d: -f2 | cut -d" " -f1 `

echo "subjectAltName = IP:$IP,IP:127.0.0.1" > extfile.cnf

openssl x509 -req -days 365 -in server.csr -CA ca.pem -CAkey ca-key.pem -CAcreateserial -out server-cert.pem -extfile extfile.cnf -passin pass:foobar

openssl genrsa -out key.pem 2048
openssl req -subj '/CN=client' -new -key key.pem -out client.csr
echo extendedKeyUsage = clientAuth > extfile.cnf
openssl x509 -req -days 365 -in client.csr -CA ca.pem -CAkey ca-key.pem -CAcreateserial -out cert.pem -extfile extfile.cnf -passin pass:foobar

rm -v client.csr server.csr

mkdir -p /vagrant/DockerCerts/

# Purge old certs on client
chmod 755 /vagrant/DockerCerts/*
rm /vagrant/DockerCerts/*

# setup keys for IDE

sudo -u vagrant cp -v {ca,cert,ca-key,key}.pem /vagrant/DockerCerts/
chmod -v 0400 /vagrant/DockerCerts/*key.pem
chmod -v 0444 /vagrant/DockerCerts/ca.pem
chmod -v 0444 /vagrant/DockerCerts/cert.pem

# Setup keys on docker host
chmod -v 0400 ca-key.pem key.pem server-key.pem
chmod -v 0444 ca.pem server-cert.pem cert.pem

cp -v {ca,server-cert,server-key}.pem /etc/ssl/certs/
mkdir -pv /root/.docker
cp -v {ca,cert,key}.pem /root/.docker
mkdir -pv /home/vagrant/.docker
cp -v {ca,cert,key}.pem /home/vagrant/.docker
echo "export DOCKER_HOST=tcp://$IP:2376 DOCKER_TLS_VERIFY=1" >> /etc/profile

# Setup Docker.service and client
SED_ORIG="ExecStart\\=\\/bin\\/docker \\-d \\-s overlay"
SED_NEW="ExecStart\\=\\/bin\\/docker \\-d \\-s overlay \\-\\-tlsverify \\-\\-tlscacert\\=\\/etc\\/ssl\\/certs\\/ca\\.pem \\-\\-tlscert\\=\\/etc\\/ssl\\/certs\\/server\\-cert\\.pem \\-\\-tlskey\\=\\/etc\\/ssl\\/certs\\/server\\-key\\.pem \\--host 0\\.0\\.0\\.0\\:2376"
sed -i "s/${SED_ORIG}/${SED_NEW}/" "/lib/systemd/system/docker.service"

systemctl daemon-reload
systemctl restart docker

SCRIPT

Vagrant.configure('2') do |config|

# Configure our boxes with 1 CPU and 384MB of RAM
config.vm.provider 'vmware_appcatalyst' do |v|
v.vmx['numvcpus'] = '1'
v.vmx['memsize'] = '512'
end

# Go through nodes and configure each of them.j
nodes.each do |node|
config.vm.define node[:hostname] do |node_config|
node_config.vm.box = node[:box]
node_config.vm.hostname = node[:hostname]
node_config.vm.provision "shell", inline: $ssl_script
end
end
end
Dont’ worry about copying and pasting. I’ve setup a github project for this work. Feel free to clone the project to your desktop. The project can be found at https://github.com/inkysea/node-appcatalyst.
The project as three key items for review.
- VagrantFile : This is a configuration script for vagrant. Vagrant will work with AppCatalyst to magically provision a photon instance, complete with docker daemon and SSL certs so you can communicate remotely with docker. Simply type “vagrant up” from the command line and watch the magic!
- DockerSettings directory : Contains a configuration file for docker, container_settings.json. The configuration file sets values such as listening port, volumes, etc. The file is used at build time and is useful for times when you don’t use ‘docker run’, like with an IDE.
- DockerOut Directory : Contains DockerFile, .dockerignore and sample nodeJS code.
A. The DockerFile instructs Docker on what to run and install. The included docker file is installing NPM and some other dependencies for a nodeJS app.
FROM node:0.10

EXPOSE 8081

# App
ADD ./package.json /tmp/package.json

RUN cd /tmp && \
npm install && \
npm install -g nodemon && \
npm install express

RUN mkdir -p /opt/app && cp -a /tmp/node_modules /opt/app/

ADD . /opt/app

WORKDIR /opt/app

# Execute nodemon on the /app/index.js file. nodemon will poll the file for updates.
CMD ["nodemon", "/app/index.js"]
B. The .dockerignore file is incredibly important if you don’t want docker to fall over after running a couple of containers. The file works similar to .gitignore but for docker, essentially defining files and directories that should not be placed into the container. In this example, the node_modules directory is ignored as it can get huge and has no business making it into your container.
.DS_Store

# Node.js
/node_modules

# Vagrant
/.vagrant

/DockerCerts

.git
.gitignore
/.idea
LICENSE
VERSION
README.md
Changelog.md
Makefile
docker-compose.yml
C. index.js is your “hello world” node JS application.
var express = require('express');

// Constants
var DEFAULT_PORT = 8081;
var PORT = process.env.PORT || DEFAULT_PORT;

// App
var app = express();
app.get('/', function (req, res) {
res.send('Hello World!\n');
});

app.listen(PORT)
console.log('Running on http://localhost:' + PORT);
Run Docker, Run…
Now you are ready to run docker on that fancy photon VM you provisioned earlier with Vagrant and AppCatalyst. You can run your container using the command line or using an IDE like IntelliJ.
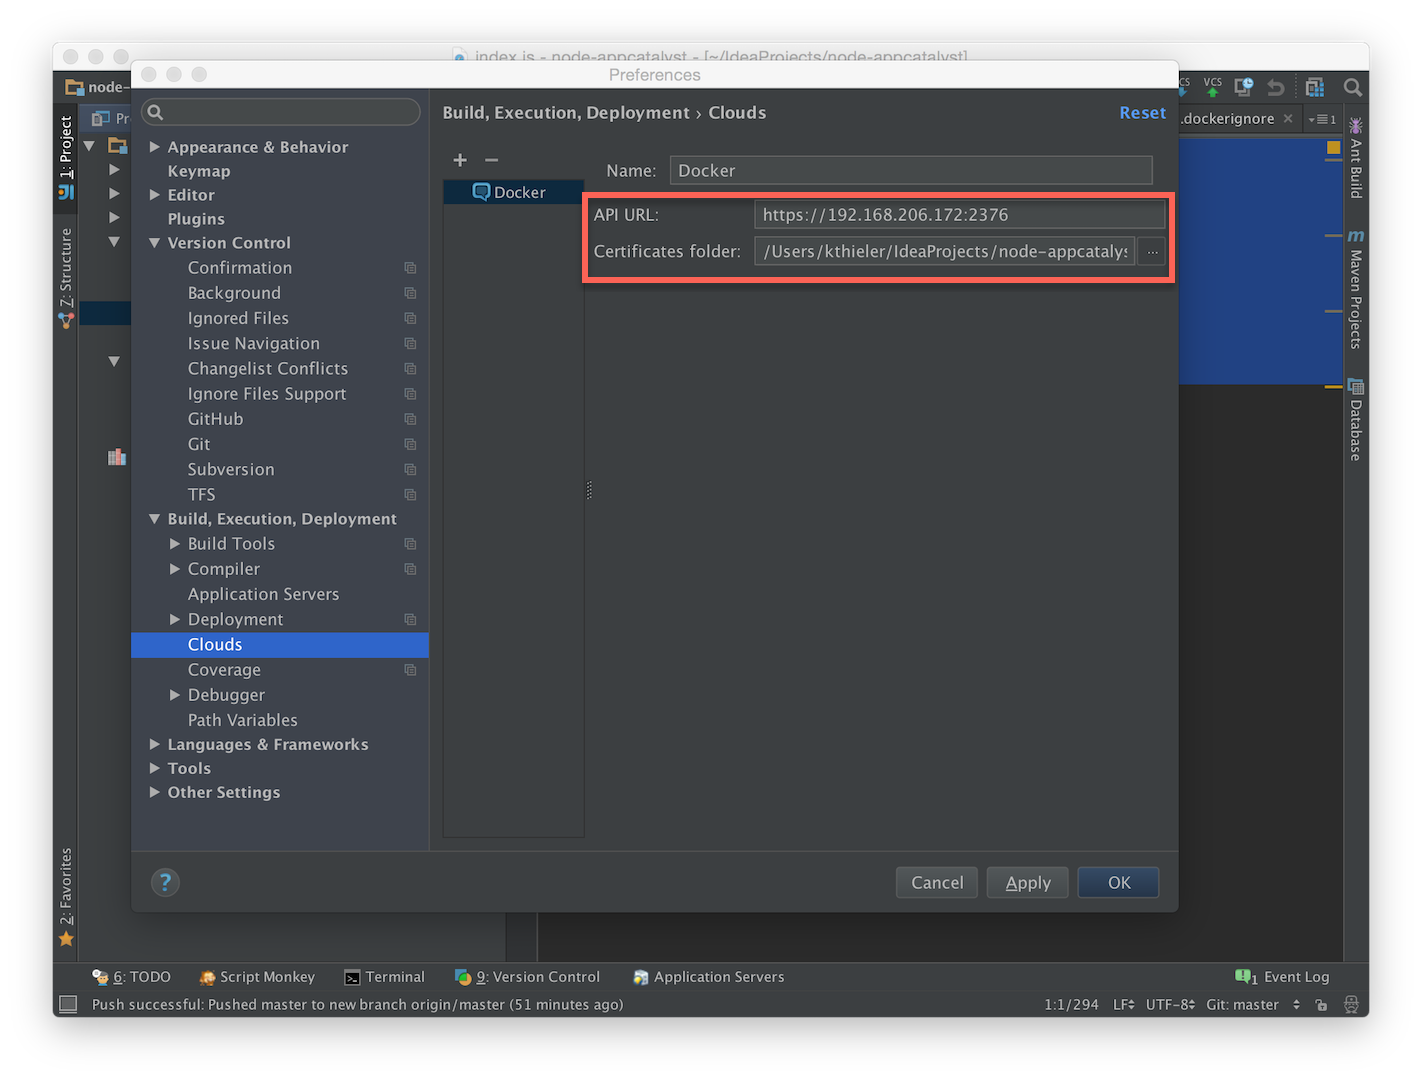
You can setup IntelliJ with the Docker SSL certs that were created by Vagrant earlier.
- Configure IntelliJ for Docker’s API. Set the API URL and the Certificates Folder. The API URL will be the IP of your vagrant VM and the docker API listening on 2376. The Certificates required for communicating docker are in your projects directory under DockerCerts, they were created by the VagrantFile.
- Configure IntelliJ to run docker. Navigate to “run” -> “edit configurations” and add a “Docker Deployment”.
- Server: Set this to the docker provider you configured previously
- Deployment : Set this to the DockerFile in the project
- Container Settings : Set this to your container_settings.json file in the project

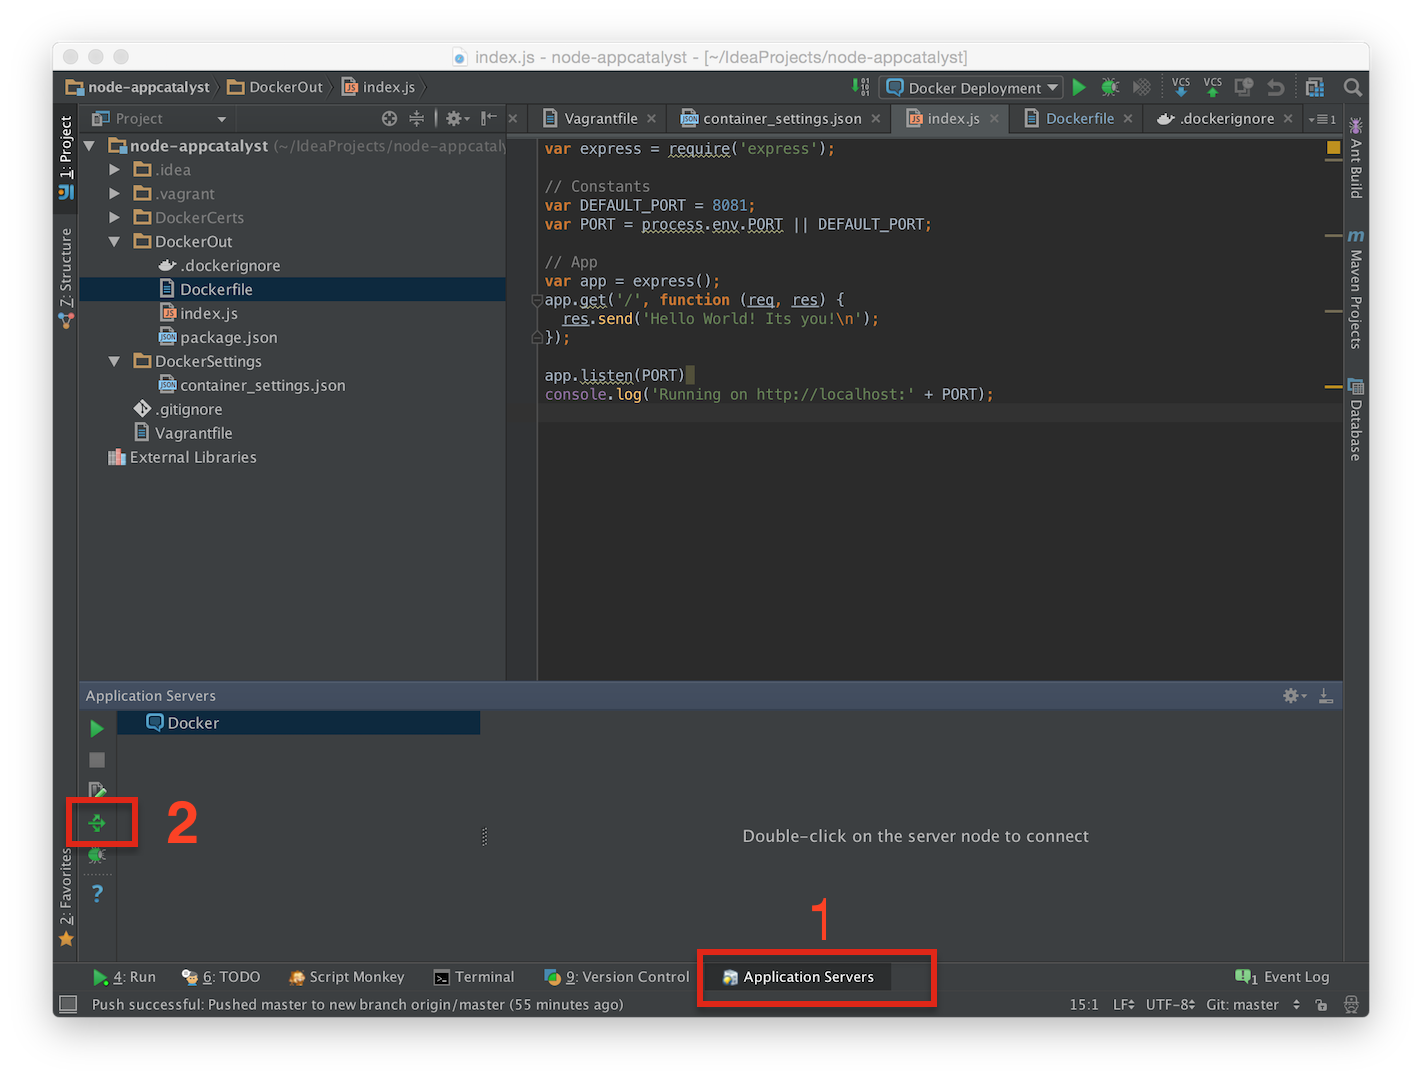
- Deploy your application into a container. 1. navigating to the “Application Servers” tab on the bottom right of intelliJ. 2. Press the deploy button.
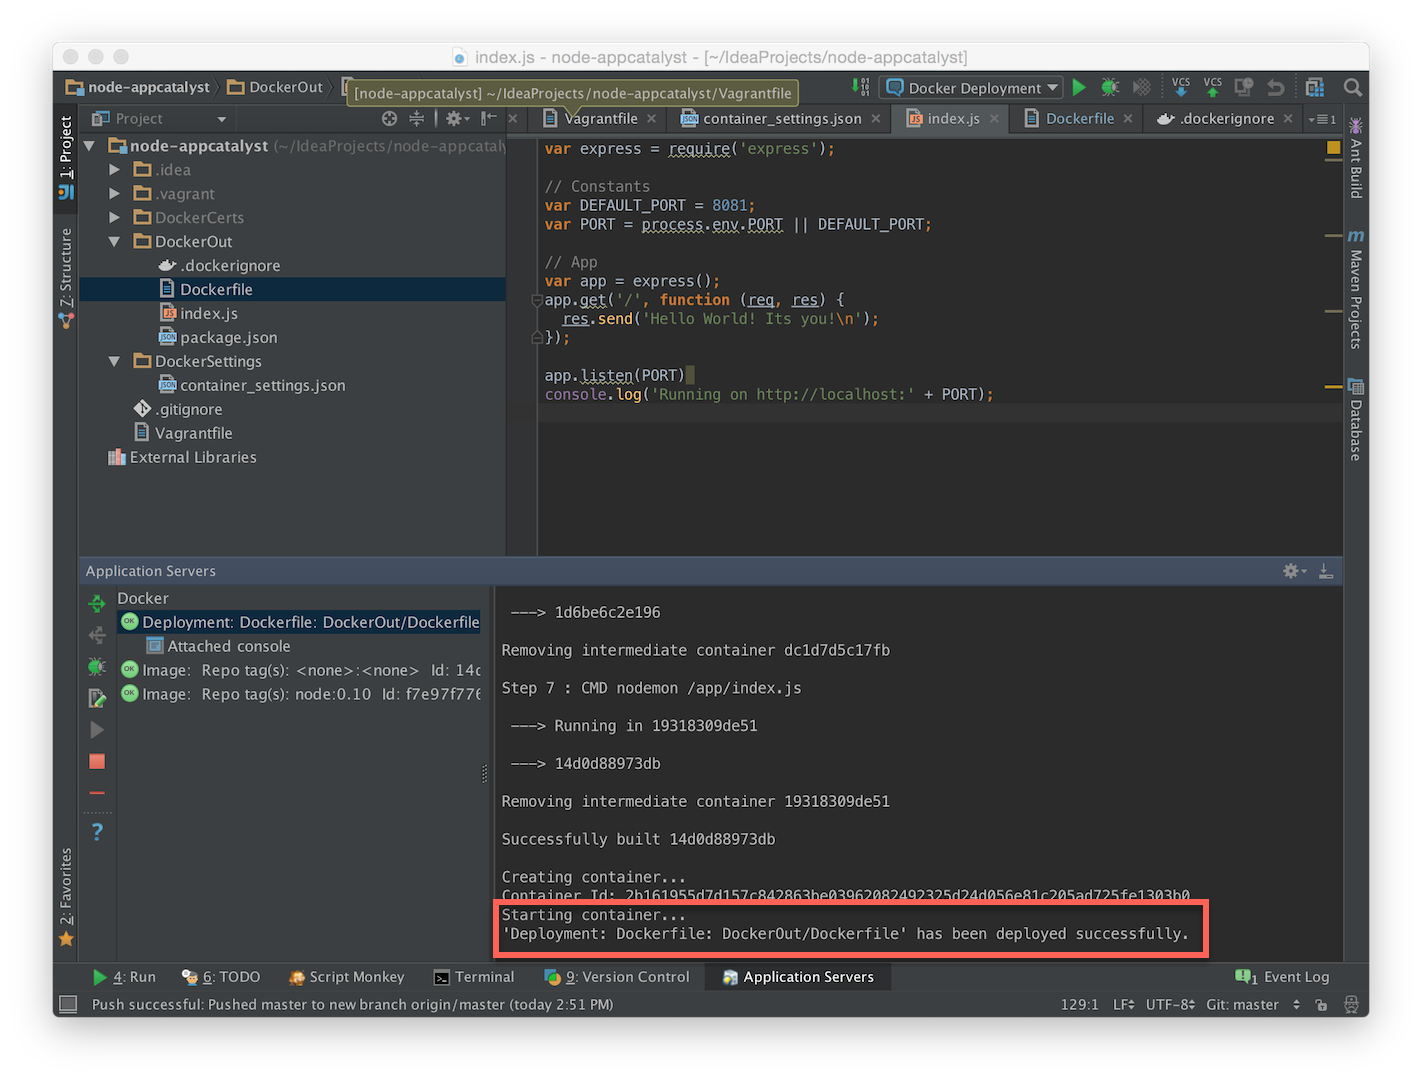
- When docker is done, you will see the following message stating that the container has successfully deployed.
 You can now browse to the IP and Port (http://vagrantIP:8081) of your container to see the hello world message.

Note: The ability to use code injection for nodeJS with nodemon is very desirable as you can simply update your code and see real time results as it is mapped into the container. Unfortunately, I haven’t found a way to make this work with the container_settings.json. In theory you should be able to map a volume in the container settings similar to ‘docker run -v’. If you want to use code injection then you are stuck using docker run -v at this time.
