Cloud PubSub, a global messaging hub for Microservices

I recently worked with my team, advising a customer on how to port their application from some other cloud into Google Cloud Platform.

One differentiator is Google AppEngine’s ability to quickly scale, absorbing sharp spikes in traffic, without requiring a “pre-warming” routine to maintain availability during sharp spikes.  There was no way to predict a traffic spike for this use case. A large spike could happen at any time, a very different nature than most workloads which can rely on a forecast for peek traffic.

Another differentiator is Cloud PubSub, a global messaging service.  An AppEngine instance in any region across the globe can publish and consume from PubSub with out requiring network gymnastics. Simply point the application at PubSub…Amazing!

The Microservice building block

AppEngine (GAE) combined with PubSub allows you to build your application in a very modular way. The cost of a new feature being implemented as a micro-service block can be forecast by the volume through PubSub and the number of GAE instances required.microserviceblock

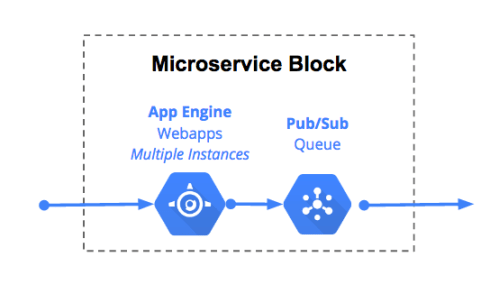
PubSub… More like Microservice hub

As you augment your application you end up with something similar to the picture below.

ExampleApp.png

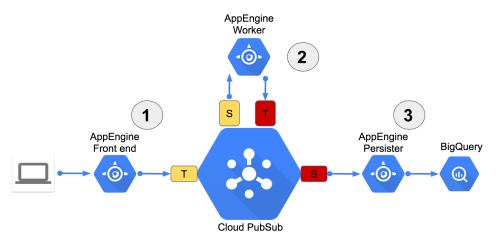
PubSub can contain 10K Topics and 10K Subscriptions!

1.  Your front-end running GAE will take all the traffic from your clients. If there is a large surprise spike, no problem! GAE will quickly create new instances in less than a second.  A topic on PubSub will be used by your front-end to push to subscribers.

2.  The business logic running in GAE will have requests pushed at it from PubSub.  This is the important part. PubSub can either be used to push or wait for a pull.

If you push, PubSub is targeting an endpoint.  In this case the http/https endpoint for your worker application in  GAE.  This approach guarantees that each message will get handled only once and GAE will scale based on how fast your business logic workers can consume. The push is perfect for this use case.

If you pull, then each message could get handled by any worker subscribing to the topic, duplicating work.  Also, in the pull model, you really can dictate the scaling of instances. Not really ideal in this use case.

3. Finally, we want to persist our work.  In this example we are using GAE to write the messages into BigQuery.  However, you could also use Dataflow to persist to BigQuery.  If you are performing ETL, I recommend DataFlow.

Epic fail?  No Sweat!

PubSub makes it easy to recover from a service disruption in your application.   There are a a couple of key features.

  1. Messages persist for 7 days.  PubSub will balloon up with messages.  If you are pushing, then PubSub will continue attempting to push to your applications endpoint for 7 days.
  2. Messages aren’t removed until they are acknowledged.  This allows you to implement exception handling for messages that can’t be process. Instead of creating a separate store for failed messages which must be reconciled, simply implement logging to alert you to the error and fix your code to handle the problem messages.  If you are performing a pull this is done with ack/nack.  If you are pushing this is done using the response code from the consumer.  A response of 200,201,204 or 102 means success.  Any other response and the message will be retried for 7 days.

Sample code?

Google provides a great example of how this works with Appengine and Pubsub. A couple of things to note about the sample code.

  1. The example code only uses one Appengine service that both pushes and consumes.
  2. The sample code pushes to PubSub with each request.  You can batch the jobs to PubSub and get much better throughput.  You can batch up to 1K message at a time. The snippet below shows you how to batch 900 messages.
if len(body["messages"]) < 900:

    data = base64.b64encode(message.encode('utf-8'))
    body["messages"].append(dict(data=data))

else:

    data = base64.b64encode(message.encode('utf-8'))
    body["messages"].append(dict(data=data))

    topic_name = pubsub_utils.get_full_topic_name()
    client.projects().topics().publish(topic=topic_name, body=body).execute()
    del body["messages"][:]


VMware Code Stream: Builds as a Micro-Service

I’ve been exploring the concept of treating software builds as micro-services.  The reasons are below.

  1.  Portability:  Just do a docker run and you’ve got a clean environment to build your software!
  2. Scale : The whole master and agent type of CI infrastructure has some limitations as the master must track the state of all the agents and pick the right type of agents to build on.  It’s really just another layer to manage.
  3. Versioning :  Build components are defined in Docker files versioned in git.  If I need to build on version X of Java, I just pull it in to my build with docker run as opposed to installing it on a system and sorting out which system has the appropriate version at build time.  Try doing that simply with a classic CI server.

I’m going to show that you can deliver software using CI methodologies using a pipeline while excluding a traditional CI server.  I have authored and contributed to plugins for Jenkins, so you may find it odd that I’m challenging the position of a classic CI server.  However, there are simply opportunities to do things differently and perhaps better.

In this case I’ll show you how to build in a micro-service fashion using VMware’s Code Stream, Photon OS and Log Insight!

No Humans allowed!

The key to a consistent build is keeping people out of the gears.  Traditionally, log analysis has kept people logging into servers and introducing a risk of drift.  At best the logs were dumped onto something like Jenkins and developers would download the logs to their desktop, sifting them with notepad.

First things first, we must address the  build logs!

Log Insight is a great tool for centralizing logs and viewing their contents.   We’ll need to turn the Log Insight agent into a container.  Take a peak at my Log Insight agent on Docker Hub.  It’s based on the photon os image on docker hub.

Don’t Blink!  Well…Go ahead and blink it’s OK.

The next challenge is to treat the build steps as processes.  Containers are perfect for this.  A container returns an exit code of the process it’s running.  It will only exist for the duration of the process!  For a build I need at least two processes.  A git clone to download the code and a maven process to build the code.  Once again, I have both git and maven on docker hub to serve as examples.

Volumes!

Now that I have 3 images,  a git image, maven image and a log insight image,  I need a way to share the data between them.   A shared volume works perfectly for this.

Got the picture?  Now here is the frame.

vRCS_container_LI

Pipeline!

I use code stream to create the containers on Photon OS and manage the stage based on the exit status of each process run.  Note that the volume and Log Insight container persist until I have them cleaned up once I’m done with the build.

How do I trigger the pipeline?  With a webhook on the git server.  Every time a code commit occurs, the webhook tells the pipeline to build.  This is perfect for an agile environment that treats every commit as a potential release candidate.

As you can see below, my maven build failed.  That’s cool because I can now look at Log Insight and see my maven build log and surefire JUnit tests to figure out where the problem is.

Micro-ServiceBuildPipeline

Visibility!

Inside log insight I can now search for my project using tags created when I instantiated my Log Insight agent during the build.  In this case, my pipeline configures the log insight agent to create a “project” tag in Log Insight.  The project is named after the code project.  I can also add a “buildNumber” tag to search for a particular build.

LogInsight.png

I can then view the entries in their context, which gives me all the data I need to know why the build failed.

ViewInContext.png

Once the logs are in Log Insight I can get fancy with dashboards collecting metrics and also alerting if certain events are logged.  Pretty slick!

Want to learn more?

I’ll be speaking at VMworld 2016 on this topic.  I’m partnering with Ryan Kelly on “vRA, API, CI, Oh My!”   If you are attending VMworld, stop by and find me.  If you aren’t attending, I’ll post more information after VMworld.


Photon Controller .9 in a lab!

I’ve been playing around with Photon Controller since .8 and I’m impressed by it’s potential.  VMware has a strong cadence for Photon Controller as .9 dropped a little more than a month after .8.

I’m sharing my experiences with running Photon Controller in a lab.

First some info on the .9 release:

  • The OVA for the deployer is 3x smaller than .8 in size!
  • Support for Kube-up is included.   This required changes on the Kubernetes side as well.  These changes are currently in master on the Kubernetes project.
  • Docker Machine support!
  • Production ready Bosh CPI

Get the bits here!

Now for the magic!

My Photon lab is a group of nested ESXI hosts running on a single host with 8 cores, 96 GB of memory and a 256GB SSD.  I’m using 1 node out of my C6100 to run the lab.  There has been a drop in memory prices recently so I doubled the memory in my lab.

That being said, you can install on far less memory and here is how!

I run Photon Platform on nested ESX and the performance is exceptional for a lab.  I’m running a total of four nested hosts.  One host for management and three hosts as cloud nodes for workload.  My hosts are each set to 18GB of memory. However, you can  deploy Photon with K8S using less than 4GB per host (16GB total) if you really press.

  1. Install the Photon deployer on your physical host or laptop.  The deployer must  be network accessible to the ESX hosts where photon controller will be deployed.
  2. Create Nested ESX hosts for the Photon Controller management and cloud nodes.  Each host will require a minimum of 4GB of memory.  I personally run with 18GB due to my physical hosts memory size.
    • Get the nested ESX OVA by William Lam and install it on your ESX host.
      1. Ensure that promiscuous mode and forged transmits are enabled on the virtual switch on the physical ESX host.
      2. Ensure that MAC learning dvFilter is enabled on the nested hosts.
    • Create a shared VMDK.  Your hosts will all use this VMDK as their image datastore to share images across all the hosts.
      1. Ensure that the VMDK is created as thick eager zero. I’m utilizing less than 1GB in my lab with a K8S installation. Adjust the size if you plan on loading more images.
      2. Ensure that the VMDK is enabled for mult-write
    • Create a local datatstore for each host.
      1. The local datastores can be created as thin
      2. The local datastores will be used for running the VMs, so they should be a  larger.  I’m currently just under 10GB utilization for the local datastores.
      3. Note that you can add local datastores later if more storage is required.  Photon controller will simply begin utilizing the additional datastores.

3.  Modify the Photon Controller deployment file to minimize management memory.  I’ve included my YAML deployment file below.

hosts:
  – metadata:
      MANAGEMENT_VM_CPU_COUNT_OVERWRITE: 2
      MANAGEMENT_VM_MEMORY_MB_OVERWRITE: 4096
      MANAGEMENT_VM_DISK_GB_OVERWRITE: 80
      MANAGEMENT_DATASTORE: esx-pp1-local
      MANAGEMENT_PORTGROUP: VM Network
      MANAGEMENT_NETWORK_NETMASK: XX.XX.XX.XX
      MANAGEMENT_NETWORK_DNS_SERVER: XX.XX.XX.XX
      MANAGEMENT_NETWORK_GATEWAY: XX.XX.XX.XX
      MANAGEMENT_VM_IPS: XX.XX.XX.XX
    address_ranges: XX.XX.XX.XX
    username: root
    password: XXXXXXX
    usage_tags:
      – MGMT
  – address_ranges: XX.XX.XX.XX-XX.XX.XX.XX
    username: root
    password: password
    usage_tags:
      – CLOUD
deployment:
  resume_system: true
  image_datastores: cloud-store
  auth_enabled: false
  stats_enabled: false
  use_image_datastore_for_vms: true
  loadbalancer_enabled: true

Note that the following from the deployment file.

  •  I added the following to restrict the size of the management VM. Note the memory is 4GB, you could deploy with 2GB to further compress the size.

 MANAGEMENT_VM_CPU_COUNT_OVERWRITE: 2
 MANAGEMENT_VM_MEMORY_MB_OVERWRITE: 4096
 MANAGEMENT_VM_DISK_GB_OVERWRITE: 80

  • The management datastore is specified as the following.

 MANAGEMENT_DATASTORE: esx-pp1-local

Note this is a local disk on the host named as a management host. My config only uses 1 host for management.  If you have more than one host, then this datastore must be a shared datastore with all management hosts attached.

  • The shared image store to be connected to all hosts is specified as

image_datastores: cloud-store

Note that  “use_image_datastore_for_vms: true”  allows the image datastore to be used for deploying VMs too.  You can set this to false if you have other disks attached to be used for the VMs.

  •  The IP address range property sets the number of cloud hosts to be used. In this case I use an IP range that spans three IP addresses.

address_ranges: XX.XX.XX.XX-XX.XX.XX.XX

4.  Modify the flavors to minimize the K8, Mesos or Swarm deployments.  Please read my earlier post or William Lam’s blog on how to set the flavors.


Script the install with Photon CLI

Within my lab I have the install of Photon Controller scripted with  photon CLI. A new tenant that includes a K8S project is ready for use in under 10 minutes.  I’ve included the script below.  Note: WordPress treats certain characters like ” and — funny. You may have to fix these characters.

#!/bin/bash

# This script assumes a fresh Photon Controller deployment and is for demonstration purposes.
# The script will create a tenant, resource ticket, project and a K8S cluster

P2_DEPLOYER="http://XX.XX.XX.XX"
P2="http://XX.XX.XX.XX:28080"
TENANT="inkysea"
TICKET="k8s-ticket"
PROJECT="go-scale"

# Deploy Photon Controller
photon -n target set $P2_DEPLOYER
photon -n system deploy esxcloud-installation-export-config-CLI.yaml


photon -n target set $P2

photon -n tenant create $TENANT
photon tenant set $TENANT
photon -n resource-ticket create --name $TICKET \
    --limits "vm.cpu 24 COUNT, vm.memory 64 GB, vm 100 COUNT,ephemeral-disk.capacity 2000 GB,ephemeral-disk 12 COUNT"
photon -n project create --resource-ticket $TICKET --name $PROJECT \
    --limits "vm.cpu 8 COUNT, vm.memory 38 GB, vm 25 COUNT,ephemeral-disk.capacity 440 GB, ephemeral-disk 4 COUNT"
photon project set $PROJECT


# Deploy k8s
PHOTON_ID=`photon -n deployment list | awk '{if (NR!=1) {print}}'`
echo "Photon Controller Deployment ID is $PHOTON_ID"

IMG_ID=`photon -n image create photon-kubernetes-vm-disk1.vmdk -n photon-kubernetes-vm.vmdk -i EAGER `
#echo "Kubernetes Image ID is $IMG_ID"

photon -n deployment enable-cluster-type $PHOTON_ID -k KUBERNETES -i $IMG_ID

photon cluster create -n k8-cluster -k KUBERNETES --dns XX.XX.XX.XX --gateway XX.XX.XX.XX --netmask 255.255.255.0 \
    --master-ip XX.XX.XX.XX --container-network 10.2.0.0/16 --etcd1 XX.XX.XX.XX -s 1


Vote for my VMworld Sessions

I have three sessions proposed for VMworld and I need your help to get there!  If you enjoyed my blog posts on automation or the Jenkins Plugin for vRA, now’s your change to support me.

You can vote for my sessions even if you are not attending VMworld.

  1.  Login to vmworld.com .  Remember, you don’t have to attend VMworld, but you do have to create a login to the vmworld site to vote.
  2. Select the star by my session to count as a vote, like the screen shot below!VMworldVote.png

My sessions are below.  Click the links and please vote!

Going Cloud Native: Kube-up, getting swarm, we made a mesos! [8916]

  • Paul Gifford and I will both bring our beards and talk about how Photon Controller integrates with Kubernetes, Swarm and Mesos!

vRA, API, CI, Oh My!!! [7674]

  • Did you enjoy the vRA Jenkins Plugin?  Come listen to Ryan Kelly and I talk about DevOps best practices with vRA.  We’ll feature how Code Stream is used to manage the pipeline for the Jenkins vRA plugin project and other good stuff I am currently writing!

Putting Dev into DevOps with vRealize Automation [7673]

  • Looking for an intro to Agile development and how to integrate vRA with Agile?  Ryan Kelly and I have just the intro for you!

Less than 16GB? K8 Photon Controller? No Problem!

VMware recently released Photon Controller .8 as an open source release.  Many of you are wondering how to install Kubernetes, Mesos or Swarm on top of Photon Controller in a resource constrained lab.   It turns out it’s very easy to shrink the default installation images for Kubernetes, Mesos or Swarm.

I’ll show you how to setup Kubernetes on a 16GB host below.  We’ll start off with a pre-installed Photon Controller .8 host that is configured as both a management node and a cloud node.

To read about installing Photon Controller, I’ll direct you to William Lam’s blog.

Before getting started make sure you have Photon CLI and Kubectl installed.

Get your Tenants, Tickets and Projects!

Log into the Photon Controller and create a tenant.  You can do this with either the gui or the photon CLI.  For this blog I am creating them in the gui.

Open your browser to the Photon Controller IP address and browse to the Tenants section.  Hit the + button to create a new tenant.

add_tenant

When creating a tenant using the GUI, you will also be prompted to create a resource ticket.  Go big with the settings for a resource ticket, even if your host doesn’t have the resources to cover the ticket.  I use the following settings.

vCPU 16,memory 48,disks 4, VM count 50

newtenant

Note that you must declare at least 240GB storage and 4 disks to install k8, swarm or mesos.  But don’t worry, you don’t actually need that much.

You’ll now see your new tenant listed.  Select the upper right corner of the tenant for a drop down list and select “New Project”.

tenantdone

Next create a project, again go big with the resources but don’t exceed what is in your resource ticket.  Reminder that you definitely need to declare 240GB storage and at least 3 disks. A second reminder to not worry if your host doesn’t have 240GB storage or 3 disks.

newproject

When complete it should look similar to this.

completedTenantProject

Load your images

Photon Controller makes it super easy to setup Kubernetes.  The Photon Controller team has included a VMDK image for Kubernetes.  Download the Kubernetes VMDK and use your photon client to load the image into Photon Controller.

First set your target.  <IP> is the IP of your photon controller management server.

$ ./photon target set http://<IP>:28080
Using target ‘http://<IP>:28080
API target set to ‘http://<IP>:28080
Now create your image.
$./photon image create ./photon-kubernetes-vm-disk1.vmdk -n photon-kubernetes-vm.vmdk -i EAGER
Using target ‘http://<IP>:28080
Created image ‘photon-kubernetes-vm.vmdk’ ID: 3bc55f7c-5bf9-4c52-8d85-c9d3bac4f5d0


What’s your Flavor?

Photon Controller uses Flavors to define VM sizing.  The default sizing for K8 master, slave and etcd are meant for scale and are too large for a small lab.  We’ll make them smaller so the fit in your lab.

View the current flavors:

$ ./photon flavor list
Using target ‘http://<IP&gt;:28080’
ID                                    Name                                      Kind            Cost
15bb4c0a-277f-423f-b928-49dd5d3185a0  cluster-vm-disk                           ephemeral-disk  ephemeral-disk 1 COUNT
                                                                                                ephemeral-disk.flavor.cluster-vm-disk 1 COUNT
                                                                                                ephemeral-disk.cost 1 COUNT
3ad4cd9c-2602-4c68-93af-9bb3f64b287c  cluster-other-vm                          vm              vm 1 COUNT
                                                                                                vm.flavor.cluster-other-vm 1 COUNT
                                                                                                vm.cpu 1 COUNT
                                                                                                vm.memory 4 GB
                                                                                                vm.cost 1 COUNT
3f3924ec-8495-4bc2-ab7b-1375489a5a5e  cluster-master-vm                         vm              vm 1 COUNT
                                                                                                vm.flavor.cluster-master-vm 1 COUNT
                                                                                                vm.cpu 4 COUNT
                                                                                                vm.memory 8 GB
                                                                                                vm.cost 1 COUNT
66a81400-bd4a-412a-ba63-5f5ea939a4bc  mgmt-vm-ec-mgmt-192-168-110-512f3de       vm              vm 1 COUNT
                                                                                                vm.flavor.mgmt-vm-ec-mgmt-192-168-110-512f3de 1 COUNT
                                                                                                vm.cpu 1 COUNT
                                                                                                vm.memory 4092 MB
                                                                                                vm.cost 1 COUNT
e31e7b64-5acc-4b76-b3d5-57d03a672091  mgmt-vm-disk-ec-mgmt-192-168-110-512f3de  ephemeral-disk  ephemeral-disk 1 COUNT
                                                                                                ephemeral-disk.flavor.mgmt-vm-disk-ec-mgmt-192-168-110-512f3de 1 COUNT
                                                                                                ephemeral-disk.cost 1 COUNT
Total: 5


Note that I highlighted the two flavors to be adjusted, cluster-master-vm and cluster-other-vm. We’ll change cluster-other-vm to use 2GB memory and cluster-master-vm to use 2 cpu and 2GB memory.

Delete the cluster-other-vm and cluster-master-vm flavors.

Delete the cluster-other-vm:

$ ./photon  flavor delete 3ad4cd9c-2602-4c68-93af-9bb3f64b287c
Using target ‘http://<IP&gt;:28080’
DELETE_FLAVOR completed for ‘vm’ entity 3ad4cd9c-2602-4c68-93af-9bb3f64b287c

Delete cluster-master-vm flavor:

$ ./photon  flavor delete 3f3924ec-8495-4bc2-ab7b-1375489a5a5e
Using target ‘http://<IP&gt;:28080’
DELETE_FLAVOR completed for ‘vm’ entity 3f3924ec-8495-4bc2-ab7b-1375489a5a5e          

You can validate that that flavors have been deleted.

$ ./photon flavor list.

Now re-create the flavors with your smaller sizes.

Note WordPress does some funny things to the “” and — characters. If you run the command and it fails, please check those characters.

Create cluster-master-vm flavor:

$ ./photon -n flavor create –name cluster-master-vm –kind “vm” –cost “vm.cpu 2.0 COUNT, vm.memory 2.0 GB, vm.cost 1.0 COUNT, vm 1.0 COUNT, vm.flavor.cluster-master-vm 1 COUNT”

Create cluster-other-vm flavor:
$ ./photon -n flavor create –name cluster-other-vm –kind “vm” –cost “vm.cpu 1.0 COUNT, vm.memory 2.0 GB, vm.cost 1.0 COUNT, vm 1.0 COUNT, vm.flavor.cluster-other-vm 1 COUNT”

Now view your updated flavors!

$ ./photon flavor list.


Create your K8 Cluster!

Use the following photon CLI command to create your k8 cluster!

./photon cluster create -n kube -k KUBERNETES –dns 192.168.110.10 –gateway 192.168.110.1 –netmask 255.255.255.0 –master-ip 192.168.110.76 –container-network 10.2.0.0/16 –etcd1 192.168.110.70 -s 1

Using target ‘http://192.168.110.41:28080&#8217;
etcd server 2 static IP address (leave blank for none):

Creating cluster: kube (KUBERNETES)
  VM flavor: cluster-small-vm
  Slave count: 1

Are you sure [y/n]? y
Cluster created: ID = 5e2d16b4-37f9-47ec-bc9c-87d169f37eed                                          
Note: the cluster has been created with minimal resources. You can use the cluster now.
A background task is running to gradually expand the cluster to its target capacity.
You can run ‘cluster show 5e2d16b4-37f9-47ec-bc9c-87d169f37eed to see the state of the cluster.

I used the -s 1 to define 1 slave.  This is important since we only have one host in the lab. If you have more hosts then you can have more slaves like -s 2.

Note that instead of deleting the cluster-other-vm you could also just create a new flavor and use the flavor with the -v flag when creating the cluster.  For example: If I created a flavor called cluster-small-vm.

./photon cluster create -n kube -k KUBERNETES –dns 192.168.110.10 –gateway 192.168.110.1 –netmask 255.255.255.0 –master-ip 192.168.110.76 –container-network 10.2.0.0/16 –etcd1 192.168.110.70 -s 1 -v cluster-small-vm

We should now have a K8 cluster created.  Use the cluster show command and the ID returned as part of the cluster create step.  The cluster show command will tell you if the cluster is ready for use and the IP addresses for both etcd and the master.

$ ./photon  cluster show 5e2d16b4-37f9-47ec-bc9c-87d169f37eed
Using target ‘http://192.168.110.41:28080&#8217;
Cluster ID:             5e2d16b4-37f9-47ec-bc9c-87d169f37eed
  Name:                 kube
  State:                READY
  Type:                 KUBERNETES
  Slave count:          1
  Extended Properties:  map[container_network:10.2.0.0/16 netmask:255.255.255.0 dns:192.168.110.10 etcd_ips:192.168.110.70 master_ip:192.168.110.76 gateway:192.168.110.1]

VM ID                                 VM Name                                      VM IP            
537ad711-e063-4ebc-a0e5-1f874eb11a4b  etcd-5e435b15-9948-4b40-8f6c-4f8da9263a03    192.168.110.70
e02b9af8-fe66-4d9a-8b89-cbdf06ef548d  master-05ecf4fd-d641-4420-9d12-f73ebed3bff4  192.168.110.76

Run a container on K8 and scale it!

We’ll use a simple tomcat container and scale it on k8. Download the following files to a directory local to your photon CLI.

Tomcat Replication Controller

Tomcat Service

Load the files to create your Jenkins POD using kubectl.

$ kubectl -s 192.168.110.76:8080 create -f photon-Controller-Tomcat-rc.yml  –validate=false

$ kubectl -s 192.168.110.76:8080 create -f photon-Controller-Tomcat-service.yml  –validate=false

Validate your pod has deployed and is running

$ kubectl -s 192.168.110.76:8080 get pods
NAME                                                     READY     STATUS                                   RESTARTS   AGE
k8s-master-master-05ecf4fd-d641-4420-9d12-f73ebed3bff4   3/3       Running                                  0          15m
tomcat-server-2aowp                                      1/1       Running   0          6m

Visit the tomcat instance at http://192.168.110.76:30001

Now scale your pods and go crazy!

kubectl -s 192.168.110.76:8080 scale –replicas=2 rc tomcat-server


Blueprints as Code with vRA and Jenkins

Blueprints as Code with the Jenkins plugin for vRealize Automation 7 is now live on Jenkins-ci.  I’ve included an Infrastructure as Code demonstration that shows vRA 7’s blueprints as code capabilities when incorporated with a CI process.  Download the plugin for Jenkins and try it out!

Updated vRA plugin for Jenkins

vrajenkinsThe Jenkins plugin for vRA has been enhanced!   The plugin has matured since it’s inception as part of a hack-a-thon during the holiday’s. See below for a list of enhancements.

  • vRA deployments can now be called in Jenkins build environments, build steps or post-build actions
  • vRA deployments can now be destroyed as part of post-build actions.  Note that if the Jenkins build environment option is used, the deployments are automatically destroyed at the end of the build.
  • Information such as environment name, machine names with IPs and NSX load-balancer VIPs are written back to Jenkins as environment variables.

Environment variables and Jenkins

If you’re familiar with Jenkins then you should be familiar with environment variables.  The plugin writes environment information from vRA as environment variables in Jenkins.  Each deployment is assigned an environment variable allowing you to resolve the name.

for example:

VRADEP_BE_NUMBER_NAME : Provides the deployment name where NUMBER is an increment  starting from 1. The number corresponds to the order of deployments specified under the build environment section.

example: VRADEP_BE_1_NAME=CentOS_7-18373323

You can leverage the variables in build steps or post-build actions.  For example:  The post-build action to destroy a vRA Deployment takes the environment variable as a parameter for the “Deployment Name”

vRA_PostDestroy.png

The project page at github has additional information on utilizing the plugin and provides a deeper dive into the environment variables produced by the plugin.

If you have any questions feel free to post them on this blog or hit me on twitter.  If you find any bugs, then please log the bugs on the Jenkins project page.

Jenkins Plugin for vRA 7!

vrajenkins

Introducing the Jenkins Plugin for vRA 7!!!

So let’s get the first question that comes to mind out of the way…

Question:  Does the Jenkins plugin for vRA 7.0 compete with vRealize Code Stream?

Answer:  Absolutely not.  The Jenkins plugin for vRA 7 is targeted at teams that need basic integration with Jenkins and vRA.  The Jenkins plugin does not provide release management or release pipeline features. Teams requiring release management and release pipeline features should evaluate vRealize Code Stream to gain visibility and control over their release process.

Now that we’ve established the scope of the Jenkins plugin versus the rich features of vRealize Code Stream, lets cover a bit of history with vRA and Jenkins.  Prior to vRA 7 and the Jenkins plugin you only had two options for integrating Jenkins with vRA.

  1.  CloudClient:  The CloudClient for vRA can be used as an integration with Jenkins and vRA.   While the cloud client for vRA is a great automation tool for vRA, it wasn’t a seamless integration with Jenkins. The CloudClient had to be installed on the Jenkins slaves and then called as a shell build step.  Functional, but not really ideal.
  2. vRealize Code Stream:  Code Stream has an excellent plugin for Jenkins that allows you to kick off release pipelines which provision vRA blueprints.  This is an excellent option for Code Stream users.

I’ll stress that the Jenkins plugin for vRA is only compatible with vRA 7. The release of vRA 7 brought enhancements to REST API that makes integrating REST calls with vRA 7 simple.   If you are using an older version of vRA (5.x or 6.x) and want Jenkins integration, then you will have to use the CloudClient or Code Stream.

The Jenkins plugin for vRA 7 has been included in the official Jenkins plugin repository and can be installed just like any other Jenkins plugin.  For instructions please visit the plugin’s wiki.  The plugin is open source and the code is available on GitHub.

If you are running vRA 7 and want Jenkins integration, then check out the Jenkins Plugin for vRA 7.


Developing a NodeJS app using AppCatalyst

If you own a Mac and are into *nix virtual machines for development, then VMware’s AppCatalyst is a must have because…

AppCatalyst is free!

AppCatalyst is targeting that hip Application/DevOps demographic that loves Macs, Linux, API/Scripting and hates GUIs.  You know the same demographic who also loves free stuff for development!   I resemble that comment…

Who wouldn’t like AppCatalyst?   People with out a Mac, or people running Windows VMs.  For that audience there is still VMware Workstation, Fusion and other virtualization alternatives.

If your still with me, then download the hotness from….

http://getappcatalyst.com/

VM’s Phssssshhhha!  How do I make it useful for development?

I’ll skip the usual unzip instructions as many other blogs have covered the basic install.  The remainder will focus on how to integrate AppCatalyst into your development environment using Vagrant and an IDE, in my case it’s IntelliJ, the result will be a simple NodeJS application.

Vagrants and Containers

I’m talking third platform apps, not your local alley bar.   AppCatalyst is packaged with project Photon, a container run time host.

Download vagrant to your desktop.  https://www.vagrantup.com/

I won’t go through the vagrant install process. It’s easy and well documented on the internet.

Install the AppCatalyst plugin for vagrant.

$ vagrant plugin install vagrant-vmware-appcatalyst

I’m also using project Photon as the container host.  There is a vagrant plugin for photon too!  Install the photon plugin for vagrant.

$  vagrant plugin install vagrant-guests-photon

Now you need a VagrantFile.  No, that’s not someone that has a fetish for vagrants. You know a VagrantFile, like this…


# Set our default provider for this Vagrantfile to 'vmware_appcatalyst'
ENV['VAGRANT_DEFAULT_PROVIDER'] = 'vmware_appcatalyst'

nodes = [
{ hostname: 'nodejs', box: 'vmware/photon' },

]

$ssl_script = &lt;&lt;SCRIPT

echo Setting up SSL...

mkdir -p /tmp/SSLCerts
cd /tmp/SSLCerts
openssl genrsa -aes256 -out ca-key.pem -passout pass:foobar 2048

openssl req -new -x509 -days 365 -key ca-key.pem -sha256 -out ca.pem -subj "/C=US/ST=GA/L=ATL/O=IT/CN=www.inkysea.com" -passin pass:foobar

openssl genrsa -out server-key.pem 2048
HOST=`hostname`
openssl req -subj "/CN=$HOST" -new -key server-key.pem -out server.csr
IP=`ifconfig eth0 | grep "inet\ addr" | cut -d: -f2 | cut -d" " -f1 `

echo "subjectAltName = IP:$IP,IP:127.0.0.1" &gt; extfile.cnf

openssl x509 -req -days 365 -in server.csr -CA ca.pem -CAkey ca-key.pem -CAcreateserial -out server-cert.pem -extfile extfile.cnf -passin pass:foobar

openssl genrsa -out key.pem 2048
openssl req -subj '/CN=client' -new -key key.pem -out client.csr
echo extendedKeyUsage = clientAuth &gt; extfile.cnf
openssl x509 -req -days 365 -in client.csr -CA ca.pem -CAkey ca-key.pem -CAcreateserial -out cert.pem -extfile extfile.cnf -passin pass:foobar

rm -v client.csr server.csr

mkdir -p /vagrant/DockerCerts/

# Purge old certs on client
chmod 755 /vagrant/DockerCerts/*
rm /vagrant/DockerCerts/*

# setup keys for IDE

sudo -u vagrant cp -v {ca,cert,ca-key,key}.pem /vagrant/DockerCerts/
chmod -v 0400 /vagrant/DockerCerts/*key.pem
chmod -v 0444 /vagrant/DockerCerts/ca.pem
chmod -v 0444 /vagrant/DockerCerts/cert.pem

# Setup keys on docker host
chmod -v 0400 ca-key.pem key.pem server-key.pem
chmod -v 0444 ca.pem server-cert.pem cert.pem

cp -v {ca,server-cert,server-key}.pem /etc/ssl/certs/
mkdir -pv /root/.docker
cp -v {ca,cert,key}.pem /root/.docker
mkdir -pv /home/vagrant/.docker
cp -v {ca,cert,key}.pem /home/vagrant/.docker
echo "export DOCKER_HOST=tcp://$IP:2376 DOCKER_TLS_VERIFY=1" &gt;&gt; /etc/profile

# Setup Docker.service and client
SED_ORIG="ExecStart\\=\\/bin\\/docker \\-d \\-s overlay"
SED_NEW="ExecStart\\=\\/bin\\/docker \\-d \\-s overlay \\-\\-tlsverify \\-\\-tlscacert\\=\\/etc\\/ssl\\/certs\\/ca\\.pem \\-\\-tlscert\\=\\/etc\\/ssl\\/certs\\/server\\-cert\\.pem \\-\\-tlskey\\=\\/etc\\/ssl\\/certs\\/server\\-key\\.pem \\--host 0\\.0\\.0\\.0\\:2376"
sed -i "s/${SED_ORIG}/${SED_NEW}/" "/lib/systemd/system/docker.service"

systemctl daemon-reload
systemctl restart docker

SCRIPT

Vagrant.configure('2') do |config|

# Configure our boxes with 1 CPU and 384MB of RAM
config.vm.provider 'vmware_appcatalyst' do |v|
v.vmx['numvcpus'] = '1'
v.vmx['memsize'] = '512'
end

# Go through nodes and configure each of them.j
nodes.each do |node|
config.vm.define node[:hostname] do |node_config|
node_config.vm.box = node[:box]
node_config.vm.hostname = node[:hostname]
node_config.vm.provision "shell", inline: $ssl_script
end
end
end

Dont’ worry about copying and pasting.  I’ve setup a github project for this work.  Feel free to clone the project to your desktop.  The project can be found at https://github.com/inkysea/node-appcatalyst.

The project as three key items for review.

  1. VagrantFile :    This is a configuration script for vagrant.  Vagrant will work with AppCatalyst to magically provision a photon instance, complete with docker daemon and SSL certs so you can  communicate remotely with docker.   Simply type “vagrant up” from the command line and watch the magic!
  2. DockerSettings directory :  Contains a configuration file for docker, container_settings.json.  The configuration file sets values such as listening port, volumes, etc.  The file is used at build time and is useful for times when you don’t use ‘docker run’, like with an IDE.
  3. DockerOut Directory :  Contains DockerFile, .dockerignore and sample nodeJS code.

A. The DockerFile instructs Docker on what to run and install.   The included docker file is installing NPM and some other dependencies for a  nodeJS app.

FROM node:0.10

EXPOSE 8081

# App
ADD ./package.json /tmp/package.json

RUN cd /tmp &amp;&amp; \
npm install &amp;&amp; \
npm install -g nodemon &amp;&amp; \
npm install express

RUN mkdir -p /opt/app &amp;&amp; cp -a /tmp/node_modules /opt/app/

ADD . /opt/app

WORKDIR /opt/app

# Execute nodemon on the /app/index.js file. nodemon will poll the file for updates.
CMD ["nodemon", "/app/index.js"]

B. The .dockerignore file is incredibly important if you don’t want docker to fall over after running a couple of containers.  The file works similar to .gitignore but for docker, essentially defining files and directories that should not be placed into the container.  In this example, the node_modules directory is ignored as it can get huge and has no business making it into your container.

.DS_Store

# Node.js
/node_modules

# Vagrant
/.vagrant

/DockerCerts

.git
.gitignore
/.idea
LICENSE
VERSION
README.md
Changelog.md
Makefile
docker-compose.yml

C. index.js is your “hello world” node JS application.

var express = require('express');

// Constants
var DEFAULT_PORT = 8081;
var PORT = process.env.PORT || DEFAULT_PORT;

// App
var app = express();
app.get('/', function (req, res) {
res.send('Hello World!\n');
});

app.listen(PORT)
console.log('Running on http://localhost:' + PORT);

 Run Docker, Run…

Now you are ready to run docker on that fancy photon VM you provisioned earlier with Vagrant and AppCatalyst.     You can run your container using the command line or using an IDE like IntelliJ.

You can setup IntelliJ with the Docker SSL certs that were created by Vagrant earlier.

  • Configure IntelliJ for Docker’s API.  Set the API URL and the Certificates Folder.   The API URL will be the IP of your vagrant VM and the docker API listening on 2376.  The Certificates required for communicating docker are in your projects directory under DockerCerts, they were created by the VagrantFile.

dockerconnection

  • Configure IntelliJ to run docker.  Navigate to “run” -> “edit configurations” and add a “Docker Deployment”.
    • Server:  Set this to the docker provider you configured previously
    • Deployment :  Set this to the DockerFile in the project
    • Container Settings : Set this to your container_settings.json file in the project

dockerrun

  • Deploy your application into a container. 1.  navigating to the “Application Servers” tab on the bottom right of intelliJ.  2. Press the deploy button.

dockerdeploy

  • When docker is done, you will see the following message stating that the container has successfully deployed.

deployedYou can now browse to the IP and Port (http://vagrantIP:8081) of your container to see the hello world message.

browse

Note:   The ability to use code injection for nodeJS with nodemon is very desirable as you can simply update your code and see real time results as it is mapped into the container.  Unfortunately, I haven’t found a way to make this work with the container_settings.json.  In theory you should be able to map a volume in the container settings similar to ‘docker run -v’.    If you want to use code injection then you are stuck using docker run -v at this time.

Selenium on Linux with yum

I’ve setup selenium with Jenkins a few times and I noticed there is no consistent documentation for setting up selenium with PHPUnit.  A search results in several different methods of varying complexity and efficacy.

Instead of going through all that mess just use the EPEL repo…

yum install epel-release

yum install php-phpunit-PHPUnit

yum install php php-xml php-devel php-pdo

yum install php-phpunit-PHPUnit-Selenium

You can probably cat the yum commands together and get the same result.  However, the order above is the way I ran them while stumbling through various documentation.