
VMware recently released Photon Controller .8 as an open source release. Many of you are wondering how to install Kubernetes, Mesos or Swarm on top of Photon Controller in a resource constrained lab. It turns out it’s very easy to shrink the default installation images for Kubernetes, Mesos or Swarm.
I’ll show you how to setup Kubernetes on a 16GB host below. We’ll start off with a pre-installed Photon Controller .8 host that is configured as both a management node and a cloud node.
To read about installing Photon Controller, I’ll direct you to William Lam’s blog.
Before getting started make sure you have Photon CLI and Kubectl installed.
Get your Tenants, Tickets and Projects!
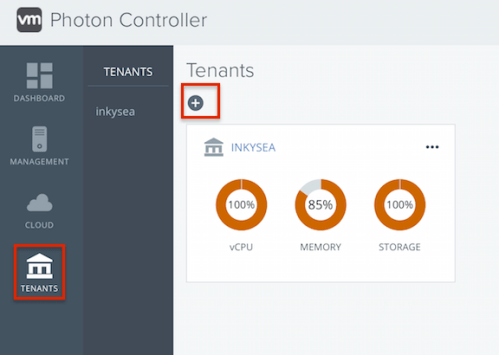
Log into the Photon Controller and create a tenant. You can do this with either the gui or the photon CLI. For this blog I am creating them in the gui.
Open your browser to the Photon Controller IP address and browse to the Tenants section. Hit the + button to create a new tenant.
When creating a tenant using the GUI, you will also be prompted to create a resource ticket. Go big with the settings for a resource ticket, even if your host doesn’t have the resources to cover the ticket. I use the following settings.
vCPU 16,memory 48,disks 4, VM count 50

Note that you must declare at least 240GB storage and 4 disks to install k8, swarm or mesos. But don’t worry, you don’t actually need that much.
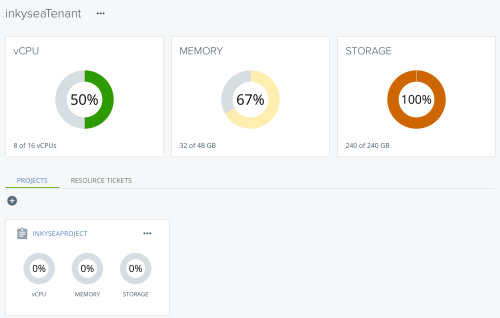
You’ll now see your new tenant listed. Select the upper right corner of the tenant for a drop down list and select “New Project”.

Next create a project, again go big with the resources but don’t exceed what is in your resource ticket. Reminder that you definitely need to declare 240GB storage and at least 3 disks. A second reminder to not worry if your host doesn’t have 240GB storage or 3 disks.

When complete it should look similar to this.
Load your images
Photon Controller makes it super easy to setup Kubernetes. The Photon Controller team has included a VMDK image for Kubernetes. Download the Kubernetes VMDK and use your photon client to load the image into Photon Controller.
First set your target. <IP> is the IP of your photon controller management server.
What’s your Flavor?
Photon Controller uses Flavors to define VM sizing. The default sizing for K8 master, slave and etcd are meant for scale and are too large for a small lab. We’ll make them smaller so the fit in your lab.
View the current flavors:
$ ./photon flavor list
Using target ‘http://<IP>:28080’
ID Name Kind Cost
15bb4c0a-277f-423f-b928-49dd5d3185a0 cluster-vm-disk ephemeral-disk ephemeral-disk 1 COUNT
ephemeral-disk.flavor.cluster-vm-disk 1 COUNT
ephemeral-disk.cost 1 COUNT
3ad4cd9c-2602-4c68-93af-9bb3f64b287c cluster-other-vm vm vm 1 COUNT
vm.flavor.cluster-other-vm 1 COUNT
vm.cpu 1 COUNT
vm.memory 4 GB
vm.cost 1 COUNT
3f3924ec-8495-4bc2-ab7b-1375489a5a5e cluster-master-vm vm vm 1 COUNT
vm.flavor.cluster-master-vm 1 COUNT
vm.cpu 4 COUNT
vm.memory 8 GB
vm.cost 1 COUNT
66a81400-bd4a-412a-ba63-5f5ea939a4bc mgmt-vm-ec-mgmt-192-168-110-512f3de vm vm 1 COUNT
vm.flavor.mgmt-vm-ec-mgmt-192-168-110-512f3de 1 COUNT
vm.cpu 1 COUNT
vm.memory 4092 MB
vm.cost 1 COUNT
e31e7b64-5acc-4b76-b3d5-57d03a672091 mgmt-vm-disk-ec-mgmt-192-168-110-512f3de ephemeral-disk ephemeral-disk 1 COUNT
ephemeral-disk.flavor.mgmt-vm-disk-ec-mgmt-192-168-110-512f3de 1 COUNT
ephemeral-disk.cost 1 COUNT
Total: 5
Note that I highlighted the two flavors to be adjusted, cluster-master-vm and cluster-other-vm. We’ll change cluster-other-vm to use 2GB memory and cluster-master-vm to use 2 cpu and 2GB memory.
Delete the cluster-other-vm and cluster-master-vm flavors.
Delete the cluster-other-vm:
$ ./photon flavor delete 3ad4cd9c-2602-4c68-93af-9bb3f64b287c
Using target ‘http://<IP>:28080’
DELETE_FLAVOR completed for ‘vm’ entity 3ad4cd9c-2602-4c68-93af-9bb3f64b287c
Delete cluster-master-vm flavor:
$ ./photon flavor delete 3f3924ec-8495-4bc2-ab7b-1375489a5a5e
Using target ‘http://<IP>:28080’
DELETE_FLAVOR completed for ‘vm’ entity 3f3924ec-8495-4bc2-ab7b-1375489a5a5e
You can validate that that flavors have been deleted.
$ ./photon flavor list.
Now re-create the flavors with your smaller sizes.
Note WordPress does some funny things to the “” and — characters. If you run the command and it fails, please check those characters.
Create cluster-master-vm flavor:
$ ./photon -n flavor create –name cluster-master-vm –kind “vm” –cost “vm.cpu 2.0 COUNT, vm.memory 2.0 GB, vm.cost 1.0 COUNT, vm 1.0 COUNT, vm.flavor.cluster-master-vm 1 COUNT”
Create cluster-other-vm flavor:
$ ./photon -n flavor create –name cluster-other-vm –kind “vm” –cost “vm.cpu 1.0 COUNT, vm.memory 2.0 GB, vm.cost 1.0 COUNT, vm 1.0 COUNT, vm.flavor.cluster-other-vm 1 COUNT”
Now view your updated flavors!
$ ./photon flavor list.
Create your K8 Cluster!
Use the following photon CLI command to create your k8 cluster!
./photon cluster create -n kube -k KUBERNETES –dns 192.168.110.10 –gateway 192.168.110.1 –netmask 255.255.255.0 –master-ip 192.168.110.76 –container-network 10.2.0.0/16 –etcd1 192.168.110.70 -s 1
Using target ‘http://192.168.110.41:28080’
etcd server 2 static IP address (leave blank for none):
Creating cluster: kube (KUBERNETES)
VM flavor: cluster-small-vm
Slave count: 1
Are you sure [y/n]? y
Cluster created: ID = 5e2d16b4-37f9-47ec-bc9c-87d169f37eed
Note: the cluster has been created with minimal resources. You can use the cluster now.
A background task is running to gradually expand the cluster to its target capacity.
You can run ‘cluster show 5e2d16b4-37f9-47ec-bc9c-87d169f37eed‘ to see the state of the cluster.
I used the -s 1 to define 1 slave. This is important since we only have one host in the lab. If you have more hosts then you can have more slaves like -s 2.
Note that instead of deleting the cluster-other-vm you could also just create a new flavor and use the flavor with the -v flag when creating the cluster. For example: If I created a flavor called cluster-small-vm.
./photon cluster create -n kube -k KUBERNETES –dns 192.168.110.10 –gateway 192.168.110.1 –netmask 255.255.255.0 –master-ip 192.168.110.76 –container-network 10.2.0.0/16 –etcd1 192.168.110.70 -s 1 -v cluster-small-vm
We should now have a K8 cluster created. Use the cluster show command and the ID returned as part of the cluster create step. The cluster show command will tell you if the cluster is ready for use and the IP addresses for both etcd and the master.
$ ./photon cluster show 5e2d16b4-37f9-47ec-bc9c-87d169f37eed
Using target ‘http://192.168.110.41:28080’
Cluster ID: 5e2d16b4-37f9-47ec-bc9c-87d169f37eed
Name: kube
State: READY
Type: KUBERNETES
Slave count: 1
Extended Properties: map[container_network:10.2.0.0/16 netmask:255.255.255.0 dns:192.168.110.10 etcd_ips:192.168.110.70 master_ip:192.168.110.76 gateway:192.168.110.1]
VM ID VM Name VM IP
537ad711-e063-4ebc-a0e5-1f874eb11a4b etcd-5e435b15-9948-4b40-8f6c-4f8da9263a03 192.168.110.70
e02b9af8-fe66-4d9a-8b89-cbdf06ef548d master-05ecf4fd-d641-4420-9d12-f73ebed3bff4 192.168.110.76
Run a container on K8 and scale it!
We’ll use a simple tomcat container and scale it on k8. Download the following files to a directory local to your photon CLI.
Load the files to create your Jenkins POD using kubectl.
$ kubectl -s 192.168.110.76:8080 create -f photon-Controller-Tomcat-rc.yml –validate=false
$ kubectl -s 192.168.110.76:8080 create -f photon-Controller-Tomcat-service.yml –validate=false
Validate your pod has deployed and is running
$ kubectl -s 192.168.110.76:8080 get pods
NAME READY STATUS RESTARTS AGE
k8s-master-master-05ecf4fd-d641-4420-9d12-f73ebed3bff4 3/3 Running 0 15m
tomcat-server-2aowp 1/1 Running 0 6m
Visit the tomcat instance at http://192.168.110.76:30001
Now scale your pods and go crazy!
kubectl -s 192.168.110.76:8080 scale –replicas=2 rc tomcat-server
