With vRealize Automation (vCAC) 6.1 you can call REST API’s to request services.
Why is this a big deal?
With a REST API you can easily introduce vRealize Automation into a continuous delivery pipeline with your favorite continuous integration tool, like Jenkins. I’ll cover how to manage a simple machine lifecycle (provision and destroy) using the REST API.
Choose your REST client
There are several options for REST clients. REST simply sits over the HTTP protocol. You can even use a command line utility like curl to make REST calls. To demonstrate vRealize Automation’s REST API I’m using a Firefox plugin called RESTClient.
Papers please!
You must first establish a session with vRealize Automation. Using the RESTClient you can request a session token using the following steps…
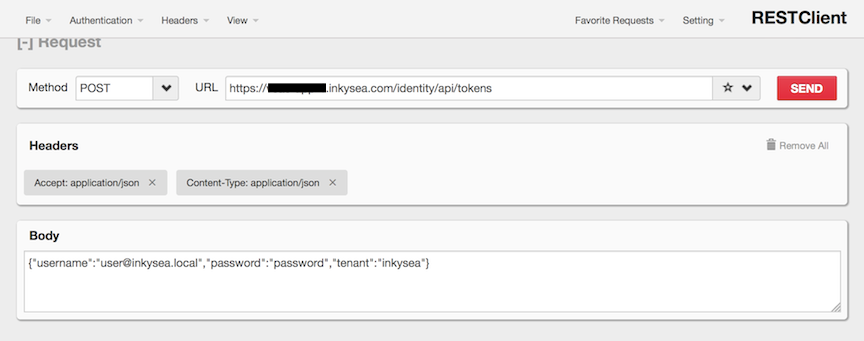
1. Get ready to POST
Set the method to POST and enter the URL to your vRealize Automation server. You’ll invoke the “tokens” API to get your session. The URL is below…
https://<vrealize-server>/identity/api/tokens
2. Set your headers
You must set your HTTP headers, regardless of the REST client. The steps are slightly different for each client. For the RESTClient select the “Headers” menu item and then select “Customer Header”. You’ll enter two headers.
Header 1: Accept : application/json
Header 2: Content-Type : application/json
Save each header to your favorites and apply each header.
3. Set the body
The body is a simple JSON string which includes the user, password and tenant.
{
username:user@inkysea.local,
password:your_password,
tenant:inkysea
}
At this point your RESTClient should look like this…

Select send and you will now see a response from the server that includes your token!

You’ve got a golden ticket! Now lets order a VM!
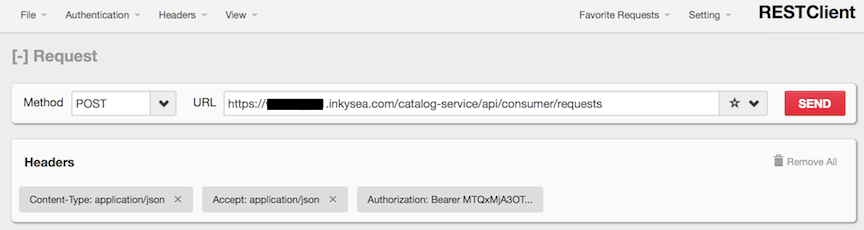
You’ll use the token as an HTTP header for the remainder of your session.
Simply add a new header called “Authorization”. The value of the header will be
Bearer <Token>
For example:
Bearer MTQxMjA3OTU1ODE5Nzo0MjA0YWU3Y2EwZmVkY2IzYWE2ZDp0ZW5hbnQ
6aW5reXNlYXVzZXJuYW1lOnZjYWNhZG1pbkBpbmt5c2VhLmxvY2FsOjE1NDZ
kZTc3YzVmN2JhYjMwMzBkMmUwNGI5N2MwYjY3NzIxMTdhZjNkOTMyMjJ
mNTA1YmI5MmQ4MDAyYmE0NzdmZTczMjcxMjA2MjQzZTcyYWY3MzU0ZjN
jZWFlOWI4OTg2NDAzYTY2NzhkMWViOGVhMDc3M2Y0NTk3Y2E5NWJm

Note that the default session timeout for a token is 24 hours.
If you want to adjust the session timeout you must ssh into the vCAC appliance add the following property
identity.basic.token.lifetime.hours=N
to the /etc/vcac/security.properties file. Note that N is equal to number of hours.
Wait….I’m entitled to what?
You need a list of services to which you are entitled, like ordering a VM. Once you get the list you’ll be able to choose the services that you want to order.
Get your entitled items using a GET request…
HTTP Action: GET
URL: https://<vrealize-server>/catalog-service/api/consumer/entitledCatalogItems
The JSON response lists all of the services. Look at the list and find which service you’d like. I’m going to order the “CentOS 6.5 x86” service
Sample JSON Response..
{
“@type”: “ConsumerEntitledCatalogItem”,
“catalogItem”: {
“id”: “60c089a1-40b6-4857-813b-7c9faaeb56f2”,
“version”: 3,
“name”: “CentOS 6.5 x86”,
“description”: “Linked Clone”,
“status”: “PUBLISHED”,
“statusName”: “Published”,
“organization”: {
“tenantRef”: “inkysea”,
“tenantLabel”: “inkysea”,
“subtenantRef”: null,
“subtenantLabel”: null
},
“providerBinding”: {
“bindingId”: “86305892-f9d4-448b-a70c-8a588cfe6aca”,
“providerRef”: {
“id”: “e17f0743-20c7-484c-8c16-426e0ee985d6”,
“label”: “iaas-service”
}
},
“forms”: null,
“callbacks”: null,
“isNoteworthy”: false,
“dateCreated”: “2014-09-12T00:33:10.541Z”,
“lastUpdatedDate”: “2014-09-13T02:39:26.717Z”,
“iconId”: “60c089a1-40b6-4857-813b-7c9faaeb56f2”,
“catalogItemTypeRef”: {
“id”: “Infrastructure.Virtual”,
“label”: “Virtual Machine”
},
“serviceRef”: {
“id”: “d922d7c1-ddb7-4fba-a8d9-90bd9688f9f0”,
“label”: “IAAS”
},
“outputResourceTypeRef”: {
“id”: “Infrastructure.Virtual”,
“label”: “Virtual Machine”
}
},
Note that you are interested in the “id” and the “bindingID” that are in bold font. Save those ID’s for later! You’ll need the ID to order the service!
I order you to give me a VM!
At this point you are ready to order a VM. Let’s recap the values we’ll need to place the order over REST.
1. The ID of the service (id). 60c089a1-40b6-4857-813b-7c9faaeb56f2
2. The name of your tenant (tentatRef). inkysea
3. The internal ID of your tenant (subtenantRef): 5ee95e3f-56a8-4a1b-a14e-62ecea9b84a3″
4. If you are ordering on behalf of another user (requestedFor): user@inkysea.local
HTTP Action: POST
URL: https://<vrealize-server>/catalog-service/api/consumer/requests
JSON Body: Replace the values in bold with values that pertain to your environment.
{
“@type”: “CatalogItemRequest”,
“catalogItemRef”: {
“id”: “60c089a1-40b6-4857-813b-7c9faaeb56f2”
},
“organization”: {
“tenantRef”: “inkysea”,
“subtenantRef”: “5ee95e3f-56a8-4a1b-a14e-62ecea9b84a3”
},
“requestedFor”: “user@inkysea.local”,
“state”: “SUBMITTED”,
“requestNumber”: 0,
“requestData”: {
“entries”: [
{
“key”: “provider-blueprintId”,
“value”: {
“type”: “string”,
“value”: “86305892-f9d4-448b-a70c-8a588cfe6aca”
}
},
{
“key”: “provider-provisioningGroupId”,
“value”: {
“type”: “string”,
“value”: “5ee95e3f-56a8-4a1b-a14e-62ecea9b84a3”
}
},
{
“key”: “requestedFor”,
“value”: {
“type”: “string”,
“value”: “user@inkysea.local”
}
},
{
“key”: “provider-VirtualMachine.CPU.Count”,
“value”: {
“type”: “integer”,
“value”: 1
}
},
{
“key”: “provider-VirtualMachine.Memory.Size”,
“value”: {
“type”: “integer”,
“value”: 1024
}
},
{
“key”: “provider-VirtualMachine.LeaseDays”,
“value”: {
“type”: “integer”,
“value”: 5
}
},
{
“key”: “provider-__Notes”,
“value”: {
“type”: “string”,
“value”: “API request”
}
},
{
“key”: “provider-VirtualMachine.Disk0.Size”,
“value”: {
“type”: “string”,
“value”: “1”
}
},
{
“key”: “provider-VirtualMachine.Disk0.Letter”,
“value”: {
“type”: “string”,
“value”: “C”
}
},
{
“key”: “provider-Cafe.Shim.VirtualMachine.TotalStorageSize”,
“value”: {
“type”: “decimal”,
“value”: 1
}
},
{
“key”: “provider-Cafe.Shim.VirtualMachine.Description”,
“value”: {
“type”: “string”,
“value”: “API request”
}
},
{
“key”: “provider-Cafe.Shim.VirtualMachine.NumberOfInstances”,
“value”: {
“type”: “integer”,
“value”: 1
}
},
{
“key”: “provider-Cafe.Shim.VirtualMachine.Reason”,
“value”: {
“type”: “string”,
“value”: “showcasing API”
}
},
{
“key”: “provider-Cafe.Shim.VirtualMachine.AssignToUser”,
“value”: {
“type”: “string”,
“value”: “user@inkysea.local”
}
},
{
“key”: “provider-Cafe.Shim.VirtualMachine.MinCost”,
“value”: {
“type”: “string”,
“value”: “0”
}
},
{
“key”: “provider-Cafe.Shim.VirtualMachine.MaxCost”,
“value”: {
“type”: “string”,
“value”: “0”
}
},
{
“key”: “description”,
“value”: {
“type”: “string”,
“value”: “API request”
}
},
{
“key”: “reasons”,
“value”: {
“type”: “string”,
“value”: “showcasing API”
}
}
]
}
}
Inside the vRealize Automation portal you now see your VM request!

Look at the request!
Looking at the request is optional. The REST call to provision the VM will return a URL to the request in it’s response header. The URL for request will look similar to https://<vrealize-server>/catalog-service/api/consumer/requests/
For example:
https://<vrealize-server>/catalog-service/api/consumer/requests/32ebbfb6-302e-4f28-a4c8-a8fb64780cb5
You can also ask vRealize for a list of all your requests. Just remove the request ID from the URL
https://<vrealize-server>/catalog-service/api/consumer/requests/
List My VMs
At this point we’ve ordered a VM and we have the request ID. You can now search for the ID of the VM that you provisioned by using the request ID.
HTTP Action: GET
URL: https://<vrealize-server>/catalog-service/api/consumer/resources/types/Infrastructure.Machine
JSON RESPONSE:
{
“@type”: “CatalogResource”,
“id”: “92c91b2e-cce0-458d-94af-22efea192669”,
“iconId”: “60c089a1-40b6-4857-813b-7c9faaeb56f2”,
“resourceTypeRef”: {
“id”: “Infrastructure.Virtual”,
“label”: “Virtual Machine”
},
“name”: “dev-119”,
“description”: “API request”,
“status”: “ACTIVE”,
“catalogItem”: {
“id”: “60c089a1-40b6-4857-813b-7c9faaeb56f2”,
“label”: “CentOS 6.5 x86”
},
“requestId”: “32ebbfb6-302e-4f28-a4c8-a8fb64780cb5”,
“providerBinding”: {
“bindingId”: “4e8838d8-f676-480b-bb02-026f8b837cd7”,
“providerRef”: {
“id”: “e17f0743-20c7-484c-8c16-426e0ee985d6”,
“label”: “iaas-service”
}
},
“owners”: [
{
“tenantName”: “inkysea”,
“ref”: “user@inkysea.local”,
“type”: “USER”,
“value”: “user@inkysea.local”
}
],
“organization”: {
“tenantRef”: “inkysea”,
“tenantLabel”: “inkysea”,
“subtenantRef”: “5ee95e3f-56a8-4a1b-a14e-62ecea9b84a3”,
“subtenantLabel”: “inkysea_developers”
},
“dateCreated”: “2014-09-30T13:24:13.522Z”,
“lastUpdated”: “2014-09-30T13:24:17.651Z”,
“hasLease”: true,
“lease”: {
“start”: “2014-09-30T13:21:23.000Z”
},
“leaseForDisplay”: null,
“hasCosts”: true,
“costs”: {
“leaseRate”: {
“type”: “moneyTimeRate”,
“cost”: {
“type”: “money”,
“currencyCode”: “USD”,
“amount”: 0.58
},
“basis”: {
“type”: “timeSpan”,
“unit”: “DAYS”,
“amount”: 1
}
}
},
“costToDate”: {
“type”: “money”,
“currencyCode”: “USD”,
“amount”: 0.58
},
“totalCost”: null,
“childResources”: [],
“operations”: [
{
“name”: “Change Lease”,
“description”: “Change the lease for a machine.”,
“iconId”: “machineChangeLease.png”,
“type”: “ACTION”,
“id”: “9c41cebc-e250-44ff-91a1-d24e02cd82cc”,
“extensionId”: null,
“providerTypeId”: “com.vmware.csp.iaas.blueprint.service”,
“bindingId”: “Infrastructure.Machine.Action.ChangeLease”,
“hasForm”: true,
“formScale”: “SMALL”
},
{
“name”: “Connect by Using VMRC”,
“description”: “Infrastructure connect using VMRC”,
“iconId”: “cafe_default_icon_genericResourceOperation”,
“type”: “EXTENSION”,
“id”: “85308de5-bfd7-4dfb-98d8-619547578fd7”,
“extensionId”: “csp.places.iaas.item.window.ConnectViaVmrc”,
“providerTypeId”: null,
“bindingId”: null,
“hasForm”: false,
“formScale”: null
},
{
“name”: “Destroy”,
“description”: “Destroy a virtual machine.”,
“iconId”: “virtualDestroy.png”,
“type”: “ACTION”,
“id”: “e0f1d583-00bd-4975-aad8-dff27cb9b76f”,
“extensionId”: null,
“providerTypeId”: “com.vmware.csp.iaas.blueprint.service”,
“bindingId”: “Infrastructure.Virtual.Action.Destroy”,
“hasForm”: false,
“formScale”: null
},
There are two items you’ll need from the JSON response. I’ve highlighted them both in bold black text in the JSON response above.
The two values are…
The VM ID (id): 92c91b2e-cce0-458d-94af-22efea192669
The Destroy action ID (id): e0f1d583-00bd-4975-aad8-dff27cb9b76f
Note: It is possible to filter the results based on ID. Filtering will limit the content returned in the JSON response.
Note: You can also get the list of actions allowed by querying /consumer/resources/<VM_ID>/action
HTTP Action: GET
URL: https://<vrealize-server>/catalog-service/api/consumer/resources/92c91b2e-cce0-458d-94af-22efea192669/action
Crush, Kill, Destroy
Now we are ready to destroy the machine and complete the lifecycle. Use the JSON body below to destroy your machine
1. The ID of your VM(resourceRef): 92c91b2e-cce0-458d-94af-22efea192669
2. The Destroy action ID (resourceActionRef): e0f1d583-00bd-4975-aad8-dff27cb9b76f
3. The tenant name in vCAC (tenantRef and tenantLabel) : inkysea
4. The name of your vCAC business group (subtenantLabel) : inkysea_developers
5. The internal ID of the vCAC business group (subtenantRef):5ee95e3f-56a8-4a1b-a14e-62ecea9b84a3
HTTP Action: POST
URL: https://<vrealize-server>/catalog-service/api/consumer/requests
JSON Body: Replace bolded text with values for your environment
{
“@type”: “ResourceActionRequest”,
“resourceRef”: {
“id”: “92c91b2e-cce0-458d-94af-22efea192669”
},
“resourceActionRef”: {
“id”:”e0f1d583-00bd-4975-aad8-dff27cb9b76f”
},
“organization”: {
“tenantRef”: “inkysea”,
“tenantLabel”: “inkysea”,
“subtenantRef”: “5ee95e3f-56a8-4a1b-a14e-62ecea9b84a3”,
“subtenantLabel”: “inkysea_developers”
},
“state”: “SUBMITTED”,
“requestNumber”: 0,
“requestData”: {
“entries”: []
}
}
Additional references
You can find more information about the REST API in the Programing Guide and REST API Documentation included with the vRealize Automation Documentation